Why Mini Split Installation is the Smart Choice for Florida Homes
Mini split installation offers Florida homeowners an efficient way to achieve customized comfort without the expense of traditional ductwork. These systems provide targeted heating and cooling, making them perfect for home additions, converted spaces, or improving comfort in poorly conditioned areas.
Key steps for mini split installation include:
- Choose the right system size by calculating BTUs.
- Select optimal locations for indoor and outdoor units.
- Install mounting hardware securely.
- Create a wall penetration for lines and wiring.
- Connect refrigerant lines with proper torque.
- Complete electrical connections (professional recommended).
- Test system operation to verify performance.
Mini splits are ideal for Florida’s climate, offering superior energy efficiency with SEER2 ratings often exceeding 20. A single-zone installation can take just a few hours, though multi-zone systems require more time.
Professional installation is strongly recommended due to refrigerant handling (EPA 608 certification required), electrical work, and warranty protection. While some DIY-friendly systems exist, improper installation can be costly.
The investment typically ranges from $2,000 to $10,500, depending on system capacity and complexity. This cost is often less than installing central air, especially in homes without existing ductwork.

Pre-Installation Checklist: Sizing, Costs, and Tools
Before starting your mini split installation, proper preparation is essential to save time and prevent headaches.
Understanding the Benefits and Considerations
Mini splits offer significant advantages for Florida homes. The primary benefit is that no ductwork is required, preventing energy loss from leaky ducts and leading to substantial energy savings. These systems are also whisper-quiet and provide zoned comfort, allowing you to cool specific rooms as needed. For more details, see the advantages of heat pump systems.
Key considerations include the upfront cost, which can be higher than a window unit, and the visual presence of the indoor unit. While DIY is possible for some, professional help is recommended due to complex refrigerant and electrical work.
Choosing the Right Type and Size
Choosing the right system is critical. You have two main options:
- Single-zone systems condition one specific area, like a sunroom or master bedroom, pairing one indoor unit with one outdoor unit.
- Multi-zone systems provide individual control for multiple rooms. One outdoor unit connects to several indoor units (2-5), each with its own thermostat.
Sizing by BTU (British Thermal Units) is crucial. While square footage is a starting point, a proper heat load calculation considers insulation, windows, and other factors for accurate sizing. Our guide explains how to calculate what size AC you need. Also, consider efficiency ratings like SEER2 (cooling), EER2 (peak cooling), and HSPF2 (heating). Higher numbers mean lower operating costs.
Estimating Costs and Finding Savings
Typical cost ranges for mini split installation vary based on system capacity and installation complexity. To save money, look for rebates and tax credits available for high-efficiency systems. We help customers in the Palm Coast and Daytona Beach areas find these savings.
Getting multiple quotes is wise, but focus on value over the lowest price. Ensure quotes include quality equipment, warranties, and experienced installers. A new, efficient system will also lower your energy bills, as explained in our guide on how installing a new air conditioner can lower your energy costs.
Essential Tools and Materials
A professional installation requires a range of tools and materials. The need for specialized equipment often makes professional help the smarter choice.
- Power Tools: A drill with a hole saw (like this example hole saw bit) is needed to create the wall opening, and a level is crucial to prevent drainage issues.
- Specialized HVAC Tools: A torque wrench ensures proper connections, while a vacuum pump and manifold gauge set are required for evacuating refrigerant lines. This step requires professional expertise and EPA certification.
- Hand Tools: Screwdrivers, wire strippers, a stud finder, safety glasses, and gloves are also necessary.
- Materials: Key materials include a lineset cover, a condenser pad for ground mounting, or an optional condenser mounting bracket for wall installations.
The Step-by-Step Mini Split Installation Process
This section outlines the installation process. However, steps involving refrigerant and electricity are best left to certified professionals.
Important Safety Precautions
Safety is paramount during installation. Please take these precautions seriously to avoid injury or costly mistakes.
- Turn Off Power: Always shut off power at the main circuit breaker before beginning any electrical work.
- Handle Refrigerant with Care: Refrigerant is a pressurized substance that can cause severe burns. Handling it requires EPA 608 certification, making this a job for trained professionals.
- Use Personal Protective Equipment (PPE): Wear safety glasses and gloves to protect yourself from debris and sharp edges.
- Check for Hidden Obstructions: Before drilling, use a wall scanner to check for hidden pipes and wires.
- Follow Local Building Codes: Adhering to local codes in areas like Palm Coast and Daytona Beach ensures your installation is safe and compliant. For more details, see our guide on Proper AC Installation Expert Steps.
Installing the Indoor Unit (Air Handler)
Proper placement of the indoor unit is key to comfort and efficiency.

- Choose the Location: Mount the unit high on a wall, preferably an exterior one, for even air distribution and simpler line routing. Avoid direct sunlight and heat sources, and ensure adequate clearance for airflow.
- Mount the Bracket: Secure the mounting bracket to wall studs. The bracket must be perfectly level to prevent condensation leaks.
- Drill the Lineset Hole: Drill a 2 to 3.5-inch hole through the wall at a slight downward angle to the outside to ensure proper drainage.
- Feed Lines and Secure Unit: Carefully feed the refrigerant lines, wiring, and condensate drain line through the hole. Finally, hook the indoor unit securely onto the bracket.
Installing the Outdoor Unit (Condenser)
The outdoor unit requires a stable, well-ventilated location to operate efficiently.

- Location: Choose a spot with excellent ventilation (at least 12 inches of clearance), away from direct sunlight and heat sources.
- Mounting: For ground installation, use a stable concrete pad. For wall mounting, use a sturdy bracket like this Optional Condenser Mounting Bracket.
- Leveling: The unit must be perfectly level to ensure proper compressor operation and refrigerant flow.
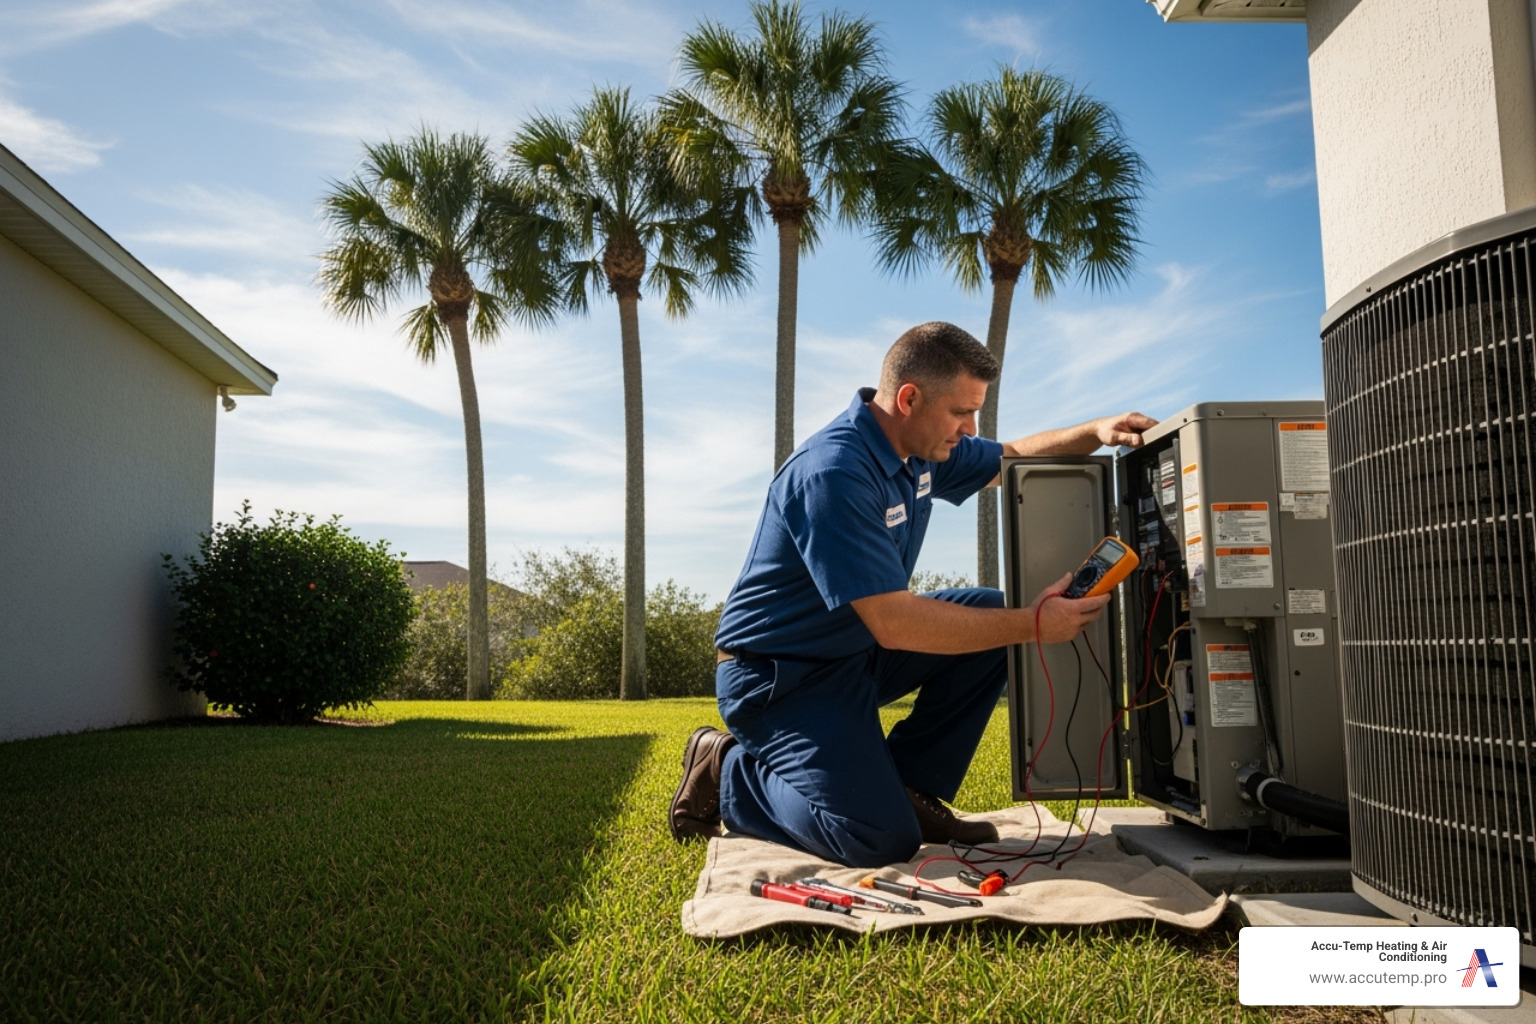
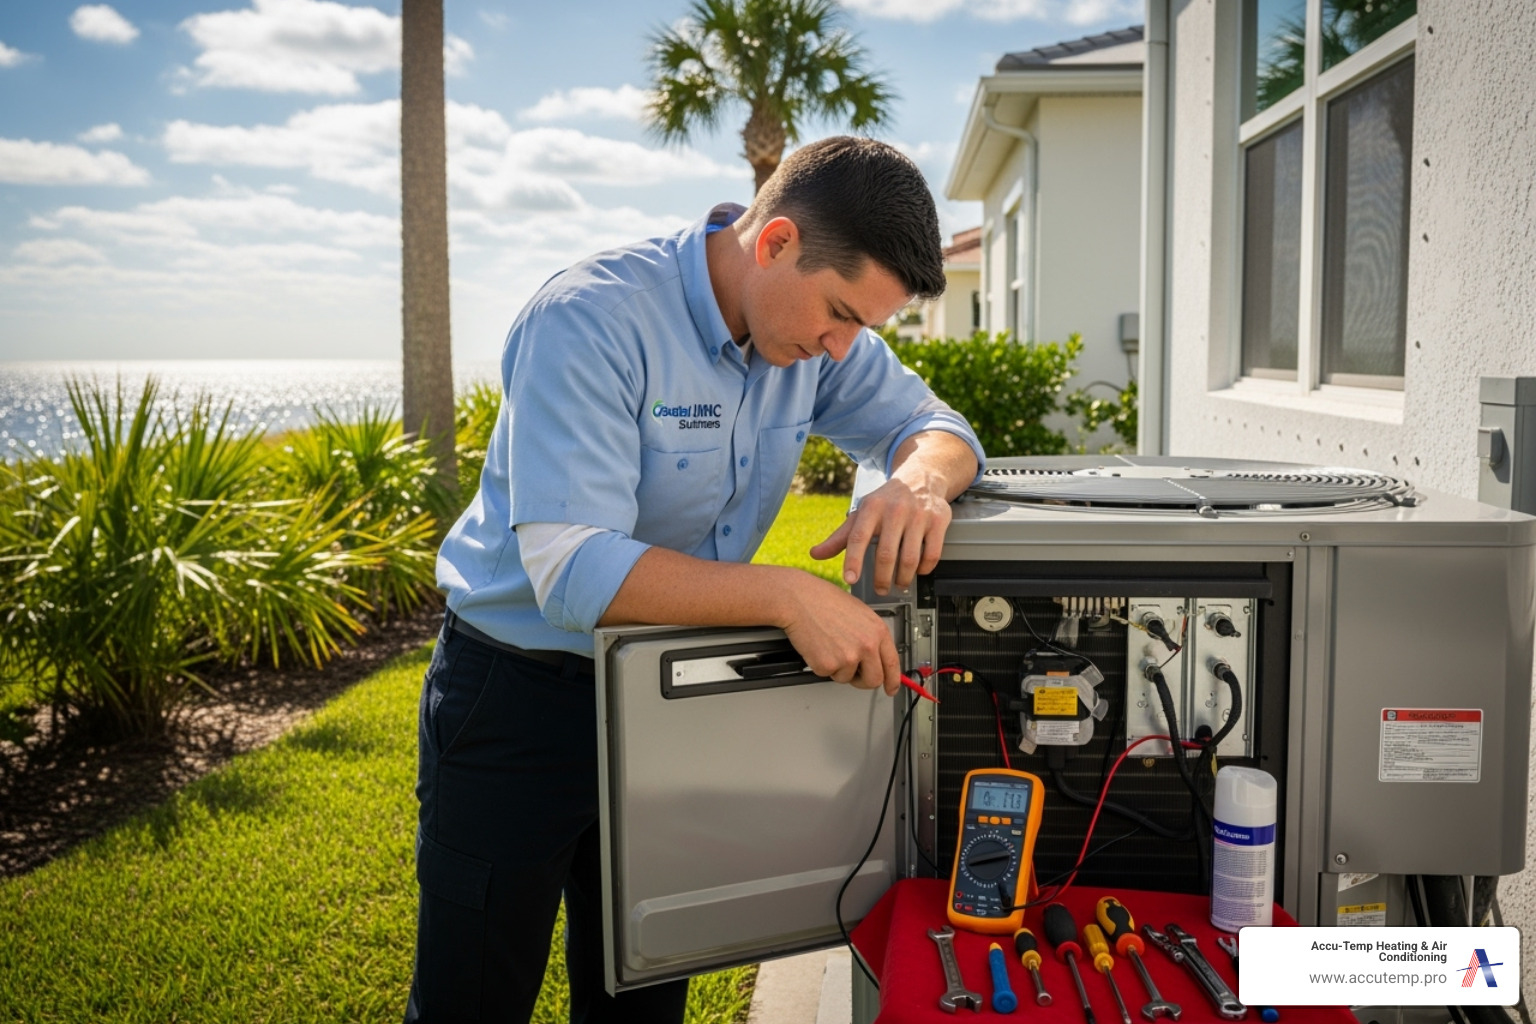
Critical Connections: Refrigerant and Electrical
These connections are the system’s lifeline and should be handled by professionals.
- Run the Lineset: The lineset bundle (refrigerant lines, wiring, drain line) must be routed carefully, avoiding sharp bends or kinks.
- Connect Refrigerant Lines: This requires precision. The copper tubing is cut, deburred, and flared. Connections are tightened to the manufacturer’s exact specifications with a torque wrench to prevent leaks. Learn about Common Heat Pump Refrigerant Issues.
- Seal the Wall Penetration: The hole in the wall must be sealed with weatherproof caulking or foam. A lineset cover provides a clean finish.
- Make Electrical Connections: This critical step requires a licensed electrician. The outdoor unit needs a dedicated circuit (120V or 240V) that meets all local codes to ensure safety.
Professional Installation vs. DIY: Making the Right Choice
While DIY kits are available, professional mini split installation is the smartest choice for most homeowners. It’s a complex job involving refrigerant, electricity, and precision connections that impact safety and comfort.
Why Choose Professional Mini Split Installation
Here’s why you should choose a professional:
- Expertise: Licensed technicians have the training for proper sizing, placement, and complex multi-zone installations.
- Refrigerant Handling: Federal law requires EPA 608 certification for handling refrigerants. Professionals do this safely and legally, preventing equipment damage and environmental harm.
- Electrical Safety: A licensed electrician ensures your unit is wired correctly to a dedicated circuit, meeting all local codes and preventing fire hazards.
- Code Compliance: Professionals understand local building codes in areas like Palm Coast and Flagler Beach, ensuring your installation is compliant.
- Warranty Protection: Most manufacturers’ warranties require professional installation. A DIY job could void your warranty. If you’re unsure about an issue, learn when to call a professional.
What to Expect from a Professional Installation
When you choose Accu-Temp for your mini split installation, you can expect a methodical, full-service approach.
- Site Assessment: We start by thoroughly evaluating your space, considering room size, insulation, sun exposure, and your comfort needs.
- Sizing and Placement: We recommend the ideal system capacity and optimal placement for maximum efficiency and quiet operation.
- Safe Installation: Our certified technicians handle every step with precision, following all safety protocols and local building codes.
- System Testing: We test all system functions to ensure perfect operation and show you how to use your new system.
Here’s a quick comparison:
| Feature | Professional Installation | DIY Installation |
|---|---|---|
| Cost | Higher upfront investment | Lower initial cost, plus tool expenses |
| Time | A few hours to a day | A full weekend or more |
| Complexity | Handled by certified experts | Requires technical skill |
| Warranty | Full manufacturer protection | Often voided by DIY work |
The bottom line is that professional installation is a wise investment for a system that should last 15-20 years. Learn more about our process here: Proper AC Installation Expert Steps.
After Installation: Maintenance and Troubleshooting
After your mini split installation, routine maintenance is key to keeping it running efficiently for years. These simple tasks can make a big difference.
Routine Maintenance for Peak Performance
- Clean the Filters Monthly: This is your most important job. Dirty filters restrict airflow, increase energy bills, and can lead to breakdowns. Learn How to Clean an HVAC Filter with our guide.
- Maintain the Outdoor Unit: Keep the area around the condenser clear of debris with at least a foot of clearance. Gently rinse the coils with a garden hose every few months to maintain efficiency.
- Check the Drain Line: Occasionally inspect the condensate drain line to ensure it’s clear and water is flowing freely to prevent backups.
- Schedule Professional Tune-Ups: An annual tune-up is essential. Our technicians will check refrigerant levels, clean internal components, and inspect electrical connections to catch problems early. Find the Regular Heat Pump Service Benefits.
Solving Common Post-Installation Problems
Knowing how to identify common issues can save you time and worry.
- Water Dripping Indoors: Excessive dripping often indicates a clogged drain line. Our guide explains what to do if your Mini Split Heat Pump to Drip Water Indoors.
- Poor Cooling/Heating: First, check for a dirty filter. If that’s not the issue, inspect the outdoor unit for dirty coils or obstructions.
- Strange Noises: Mini splits are quiet, so new noises need attention. Vibrating could be a loose part, gurgling may signal a refrigerant issue, and squealing often points to a fan motor problem. Call a professional for diagnosis.
- Refrigerant Leaks: Signs include poor cooling, ice on the lines, or a gurgling sound. This is a serious issue that requires immediate professional service.
While you can handle basic troubleshooting, call us for any refrigerant, electrical, or persistent problems. Find more advice in our Expert Tips for Troubleshooting Heat Pump Issues.
Frequently Asked Questions about Mini Split Installation
Here are answers to the most common questions we receive about mini split installation.
How long does a mini split installation take?
The time required depends on the system type and complexity. A professional single-zone installation typically takes a few hours to a full day. A multi-zone system is more complex and usually takes one to three days to install, as it involves connecting multiple indoor units to a single outdoor unit.
Is a mini split cheaper to install than central air?
Yes, a mini split installation is often cheaper than central air, particularly in homes without existing ductwork. The primary saving comes from avoiding the significant cost and disruption of installing a new duct system. Even in homes with ducts, adding a mini split to a new addition or a hard-to-cool room is typically more economical than extending existing ductwork.
Can I install a mini split on an interior wall?
Yes, a mini split can be installed on an interior wall, but it adds complexity. The challenge is routing the refrigerant lines, wiring, and drain line to the outdoor unit. An important consideration is drainage; an interior wall installation often requires a condensate pump to move water to an exterior drain. This type of installation benefits greatly from professional planning.
Conclusion

We hope this guide has provided the knowledge you need to make a confident decision about mini split installation for your Florida home.
Mini splits offer incredible benefits, including zoned comfort and superior energy efficiency, which can significantly reduce your utility bills by eliminating the energy losses associated with ductwork.
We’ve stressed the importance of proper installation because it’s the foundation of a reliable, long-lasting system. The process involves complex refrigerant, electrical, and code compliance work that is best left to professionals.
At Accu-Temp Heating & Air Conditioning, our family-owned business has years of experience serving the Palm Coast and Daytona Beach areas. We understand our local climate and offer a 100% satisfaction guarantee on our work.
Whether you need a single-zone or multi-zone system, we are here to help. For expert advice and professional installation you can trust, explore our mini split heat pump services. Let us help you create the comfortable home you deserve!